12 - Converting Timber Frames to SIPs
Technical Bulletin #11
Created 11/02/22
Download FTB012 - Converting Timber Frames to SIPs
You may also be interested in:
Salvation Army 22 Multi-Units
Case Study & Video
Speed up your build with
Formance pre-nail
Energy-Efficiency with Formance
House R-values vs energy efficiency, have you been fooled?
Formance walls offer a readily available performance upgrade to timber-framed walls. Used primarily for the external walls, they replace traditional framing with a more energy-efficient and faster-to-install alternative. Internal walls can still be timber frame & utilised for running services.
With Formance walls the structure, insulation and bracing are included in the system, reducing time to install, and speeding up the overall construction timeline.
For the occupant, Formance walls reduce drafts, and increase comfort levels, and at the same time reducing energy usage.
This bulletin outlines the steps required for the project designer to convert a house plan from timber framed walls to Formance SIPs.
Step 1 – Get the Formance Design Guide
The Formance Design Guide is recognized by councils throughout New Zealand for the design and specification of the Formance system demonstrating compliance with the New Zealand Building Code. Certified under the CodeMark scheme the Formance Design Guide allows for homes to be designed from pre-engineered tables and details by Licensed Building Practitioners without requiring additional engineering approval of the structure. Go to https://www.formance.co.nz/for-designers/design-support-services/ to obtain the latest version of the guide.
Step 2 – Choose the panel thickness
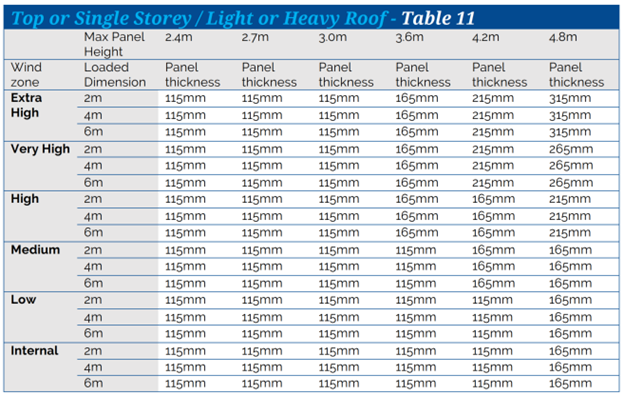
Formance panels come in a range of thicknesses. For walls, typical sizes are 115mm (R2.8) and 165mm (R4.3). As a guide, if your project originally used 90mm framing, choose 115mm, and if your project used 140mm framing, choose 165mm panels. Construction R values for these thicknesses are approximately 50% greater than the equivalent timber framed size.
When choosing the panel thickness check that the size you have chosen is suitable for the maximum span required for the wall height and wind zone – refer to Table 11 in the Design Guide. (page 36/126)
Step 3 - Define the cap plate type
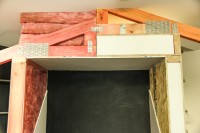
With the Formance system the term cap plate, refers to a timber member sitting across the top of the panel. This provides load bearing capacity for point loads created by trusses that are directly sitting on top of the panel. Using table 14 or 15 in the Design Guide, (pages 40 & 41/126) specify the type of cap plate for your project. Increased load bearing capacity is available for larger roof spans by increasing the thickness of the cap plate. Tables 14-19 show required cap plates for various loading scenarios. Note timber trusses are referred to as “roof framing” in the guide.
The various cap plate types are shown in the image below.
Step 4 - Convert the bracing plan to Formance
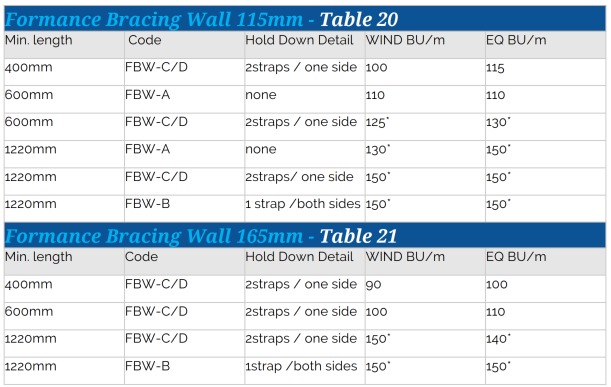
The Formance wall system is compatible with commonly adopted methods of bracing design, including the GIB EzyBrace® system. Using the demands in your existing design, update the bracing codes with equivalent or stronger Formance bracing codes from Tables 20 and 21, see figure 3 below (page 42/126) in the Formance Design Guide.
There are 4 types of bracing codes in the Formance system. FBW-A requires no additional straps, simply relying on a tighter nail-spacing. FBW-B, FBW-C (best option for direct fixed plasterboard on the interior) and FBW-D (for timber floors) require 6kN hold down straps – see details on pages 115 and 116/126 in the Formance Design Guide.
Step 5 - Specify the cladding fixings
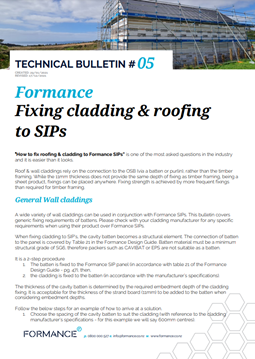
The Formance wall system is compatible with most types of claddings. Claddings attach to cavity battens which are fixed to the exterior OSB skin of the panel. The centres of these fixings are specified on table 21 on page 51/126 of the Formance Design Guide.
Formance Technical Bulletin #05 “Cladding and Roofing Fixing” covers the process required to specify these fixings.
Step 6 – Specify the Formance lintel type
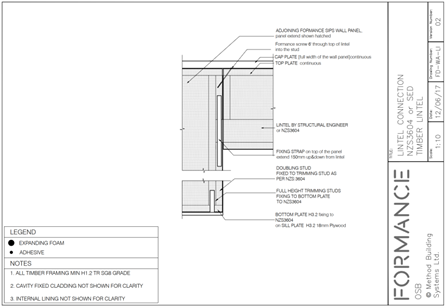
The Formance wall system has 2 options for lintel types, either a ‘Formance Lintel’ which uses the lintel panel as a box beam, or incorporation of a NZS3604:2011 lintel.
Use tables 24-26 (pages 54/126 onwards) in the Formance Design Guide to check Formance lintel spans and options available.
NZS3604:2011 timber framed lintel within the panel – Figure 5
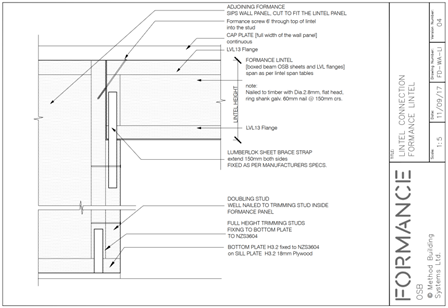
Formance lintel – Figure 6
Step 7 - Services
Access for plumbing & electrical services need to be considered.
Plumbing penetrations straight through the panel are permissible but running water pipes within the panel are best to be avoided. If there needs to be water run on an external SIP wall, then a service cavity could be constructed to allow for the piping (putting the internal lining on a cavity batten). More information on page 11/126 of the Formance Design Guide.
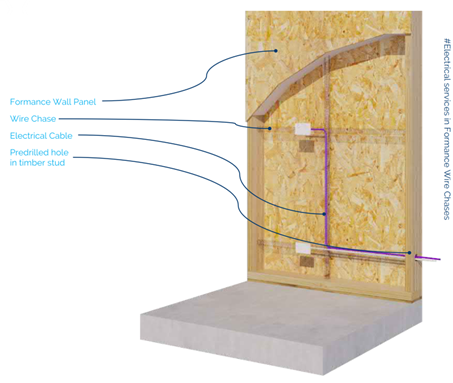
Electrical wiring can be run two ways, one way is within the panel with the provision of an electrical chase. This is reviewed at the shop drawing stage. The second way is to batten the gib off the face off the panel allowing for a 20mm cavity to run the wiring. More information on page 10/126 of the Formance Design Guide.
Step 8 - Update the plans and fill out checklist
Using the information in the previous steps update the drawings to reflect the use of Formance Structural Insulated Panels for the external walls. This may include revision to the following drawings and specifications:
- Floor plan
- Bracing plan & calculations
- Cladding fixings
- Relevant construction details
Complete the checklist to go with your consent application (or amendment if changing an existing consent). You will need to also include a full copy of the Formance Design Guide in your submission.
For usage tips and to download an easy-to-use editable version of the PDF checklist, view here: https://www.formance.co.nz/technical/design/designers-checklist-2/
Plans get sent to Formance for generating shop drawings (shop drawings fee of $4k + GST payable at this point) in which Formance carries out a check to make sure the design is within the scope of the design guide then issues the shop drawing for reviewing by the designer. These shop drawings set the basis of the manufacturing drawings.
For pricing and supply questions get in touch with Formance on 0800 000 527 or [email protected]
Useful references and links
For all design resources available online including technical bulletins: https://www.formance.co.nz/technical/design/
To get the Formance Design Guide: https://www.formance.co.nz/for-designers/design-support-services/


